Introduction
Making a kalimba is an easy, fun and rewarding project. It is an ancient African instrument, similar to a thumb piano, that can be made with everyday items and a little bit of creativity. With just a few supplies and some basic knowledge, you can make your own kalimba in no time. This guide will provide you with step-by-step instructions on how to make a kalimba. From choosing the right materials and tools to assembling and tuning the instrument, you will be able to make a beautiful kalimba that will provide hours of musical fun. So let’s get started!
How to Choose the Right Kalimba for You
Kalimbas are a unique instrument that have become increasingly popular in recent years. Whether you are a beginner or a more experienced musician, choosing the right kalimba for you can be a daunting task. Here are a few tips to help you make the best decision.
- Consider Your Skill Level: It’s important to choose a kalimba that is suitable for your skill level. If you are a beginner, look for a kalimba with a simple layout and basic tuning. If you are an experienced musician, you might want to look into a more complex model with more bells and whistles.
- Think About Your Music Style: Different kalimbas are suited for different music styles. If you are looking for an instrument for traditional African music, you might want to look for an instrument with a deeper tone. If you are looking for an instrument for modern music, look for a kalimba with a brighter tone.
- Consider Your Budget: Kalimbas come in a wide range of prices, so it’s important to consider your budget before making a purchase. If you are on a tight budget, you might want to consider a lower-priced model. If you have the money, you can find more expensive models with higher quality materials and more features.
- Read Reviews: Before purchasing a kalimba, take the time to read reviews. This will give you a better idea of what to expect from the instrument and whether it is worth the price.
How to Tune a Kalimba for Perfect Pitch

Materials and Tools Needed
Before you begin, gather the following materials and tools:
- Wooden board
- Saw
- Sandpaper
- Drill
- Metal rods or tines
- Pliers
- Glue
- Decorative elements (optional)
Choosing the Right Wood
Selecting the right wood for your kalimba is crucial as it affects the sound and durability of the instrument. Hardwoods such as mahogany, walnut, or maple are commonly used for kalimba construction. Ensure that the wood is at least 1/2 inch thick to provide enough resonance.
Preparing the Kalimba Body
Using a saw, cut the wooden board into the desired shape and size for your kalimba body. It is typically rectangular or trapezoidal in shape. Sand the edges and surfaces of the body to remove any roughness or splinters.
Marking and Drilling the Tines
On the top surface of the kalimba body, mark the positions for the tines. The number of tines can vary depending on the size of the kalimba you want to make. Use a drill to create evenly spaced holes at the marked positions. Ensure that the holes are slightly smaller than the diameter of the tines.
Shaping and Sanding the Tines
Cut the metal rods or tines into the desired lengths for your kalimba. Use pliers to shape the tines into a slight curve to improve the sound quality. Sand the edges of the tines to remove any sharpness or burrs.
Assembling the Kalimba
Apply a small amount of glue to the bottom end of each tine and insert them into the corresponding holes in the kalimba body. Press them firmly to ensure a secure fit. Allow the glue to dry completely before proceeding.
Tuning the Kalimba
To tune your kalimba, pluck each tine and adjust its length by trimming it with pliers until it produces the desired pitch. Use a tuner or a reference kalimba to guide you in achieving the correct notes.
Adding Decorative Elements
If desired, you can enhance the appearance of your kalimba by adding decorative elements such as beads, shells, or carvings. Let your creativity shine through and make the instrument uniquely yours.
Testing and Adjusting the Sound
Once the kalimba is fully assembled and tuned, play each tine to test the sound. Adjust any tines that may be too low or too high in pitch by either lengthening or shortening them slightly. Continuously test and make adjustments until you are satisfied with the sound quality.
Finishing Touches
Apply a protective finish, such as a varnish or wax, to the entire kalimba body. This will help protect the wood from moisture and enhance its durability. Allow the finish to dry completely according to the manufacturer’s instructions.
The Basics of Playing the Kalimba: Notes, Chords and Improvisation
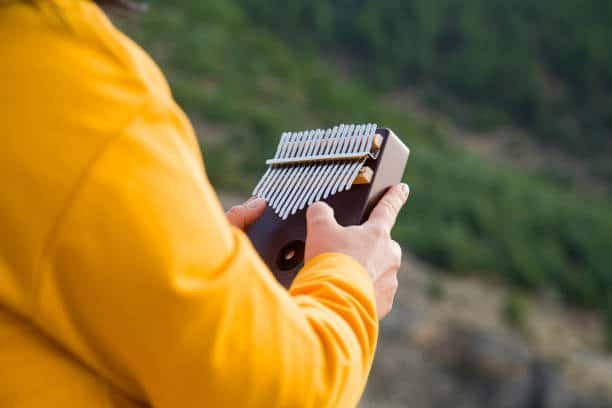
The kalimba is an African musical instrument consisting of a wooden board with metal tines of varying lengths. It is played by plucking the tines with the thumbs. The kalimba has a unique sound that is both soothing and captivating.
To get started playing the kalimba, it’s important to understand the basics of notes and chords. Notes are the individual tones that make up a melody. They can be played one at a time or in succession to create chords. Chords are groups of notes that are usually played together to create a harmonious sound.
Each kalimba is tuned to a specific scale. Knowing the notes in the scale and the chords they form will help you create melodies and play songs. You can find the notes of your kalimba’s scale printed on the back or side of the instrument.
Once you’ve learned the notes and chords in your kalimba’s scale, you can begin to improvise. Improvisation is when you create music spontaneously without relying on a pre-existing melody or song. To improvise, you need to experiment with different combinations of notes and chords. Listen to the sound of each combination and find what works best for what you’re trying to create.
Finally, practice playing the kalimba regularly. The more you play, the better you’ll become. You can also try listening to different types of music and trying to replicate the melodies you hear. This will help you develop your improvisation skills.
With a little practice, you’ll soon be able to create beautiful music with your kalimba.
Simple Tips for Making Your Own Kalimba
Kalimbas are an ancient African musical instrument that is still popular today. They are relatively easy to make and can be a fun and creative activity for all ages. Here are some simple tips for making your own kalimba:
- Gather your materials – You will need a wooden board, some small nails, some metal keys, and some strings. Choose a wood type that is easy to work with and will make a good sounding instrument.
- Cut the board – Measure and cut the board to the desired size. Make sure to leave enough room for the metal keys and strings.
- Drill holes – Drill small holes in the board for the metal keys. Make sure to leave enough room between the holes to allow the keys to move freely.
- Add the keys – Place the metal keys into the drilled holes. If needed, you can use a hammer to secure them in place.
- Attach the strings – Tie the strings to the metal keys and then secure them to the board. Make sure the strings are tight enough for the keys to move freely.
- Tune the instrument – Adjust the strings until you get the desired sound. This may take some practice and patience, but you will soon be able to play your own kalimba!
Making your own kalimba can be a fun and creative process. With these simple tips, you can create a beautiful instrument that will last for years to come.
How to Use a Kalimba to Create Melodies and Accompaniment Parts
A Kalimba is a type of African thumb piano that is used to create beautiful melodies and accompaniment parts. The instrument is easy to learn and can be used to create many different kinds of music. In this article, we will look at how to use a kalimba to create melodies and accompaniment parts.
First, it’s important to understand the basic layout of a kalimba. It has a series of metal tines, which are typically arranged in a triangle shape. Each tine is tuned to a different note, and when you pluck them, they create the melody. It’s important to understand the notes and the layout of the tines so you can create melodies and accompaniment parts.
Next, it’s important to understand how to use the right technique to create melodies and accompaniment parts. You should use your thumb to pluck the tines, and use your fingers to dampen strings that you don’t want to sound. You can also use the palm of your hand to dampen the strings and create a softer sound.
Once you’ve figured out the basics of the instrument, you can start to create melodies and accompaniment parts. Start by playing simple melodies, and as you get more proficient, you can add more complex parts. For example, you can create layers of sound by playing multiple tines simultaneously, or create a more rhythmic accompaniment by playing alternating tines. You can also experiment with different tunings and scales to create different sounds.
Finally, it’s important to practice regularly to get better. Start by practicing simple melodies and accompaniment parts, and then move on to more complex pieces. As you get more familiar with the instrument, you’ll be able to create more intricate melodies and accompaniment parts.
Using a kalimba to create melodies and accompaniment parts can be a great way to make music. With practice and patience, you can create beautiful music with this unique instrument.
Exploring Different Kalimba Techniques: Strumming, Hammering and Plucking
Kalimba, also known as the African thumb piano, is a fascinating instrument that has been gaining popularity across the world in recent years. It is a percussion instrument made from metal or wooden tines that are plucked with the thumbs or fingers. While the instrument is fairly simple to play, there are a variety of techniques that can be used to create different sounds and timbres. In this article, we will explore the three main techniques used to play the kalimba: strumming, hammering, and plucking.
Strumming on the kalimba is an easy technique that is often used for accompaniment. To strum, you simply use your thumbs to lightly brush across the tines of the kalimba. This technique produces a light and airy sound that works well with slower, more contemplative pieces. Strumming can also be used to create a more lively sound by increasing the speed and intensity of the strumming.
The hammering technique is similar to strumming, but it involves striking the tines with your fingers instead of brushing them. This technique produces a more percussive sound that is great for faster pieces. To hammer on the kalimba, you can use your index and middle fingers to strike the tines.
Finally, there is the plucking technique. Plucking is the most common technique used to play the kalimba and it involves using your thumbs to pluck the tines one at a time. This technique is used to create a melodic sound that is great for solo pieces. To pluck the kalimba, you should use a light touch and press down with your thumbs.
By using these three techniques, you can create a wide variety of sounds and timbres on the kalimba. Whether you want to create a gentle, contemplative sound or an upbeat, percussive sound, you can use strumming, hammering, and plucking to express yourself. With some practice and experimentation, you can discover your own unique style of playing the kalimba.
Conclusion
Making a kalimba is an enjoyable and rewarding experience that can provide hours of entertainment. It requires patience and practice, but the result is a unique and beautiful instrument that will bring joy for years to come. With the right materials, tools, and instructions, it’s possible for anyone to make a kalimba. With a little creativity and a willingness to learn, you can be playing music with your very own homemade kalimba in no time!